

DM Maps vs Player Maps — Making Two Maps for Your TTRPG Campaign
In this step-by-step guide, I’ll show you how to create two complementary maps for your tabletop RPG: a detailed DM map packed with functional information, and a player-facing map that’s aesthetic, mysterious, and built to be explored. I'm Ryan from Red Quills, and over the years I’ve developed workflows and iconography that help DMs run richer, more believable worlds. This article walks through the entire process I use, why each choice matters, and how to apply these ideas to your own campaign maps.
"One game, two maps might seem like a lot of effort for your D&D or TTRPG campaign."
If you want players to feel like explorers rather than tourists, the maps you hand them should reinforce that. The DM map is your working document — dense, compressed, and full of world-building hooks. The player map is your immersion tool — evocative, sparse where it needs to be, and intentionally incomplete so the party can fill in the blanks.

Step 1: Gather materials and set the scope
Before drawing a single line, choose a physical or digital medium and decide the map's scope. I prefer a thick 180 GSM watercolour paper because it handles washes and ink well, and because I often split one sheet into two maps — one for me, one for the players.
- Paper or medium: 180 GSM watercolor paper works great for ink + watercolor. If digital, set a canvas that can be printed at a comfortable scale.
- Pens and brushes: A fine ink pen for labels/details and a couple of watercolor brushes for washes.
- Time budget: Plan an initial pass of a few hours — the DM map generally takes longer to make than the player map.
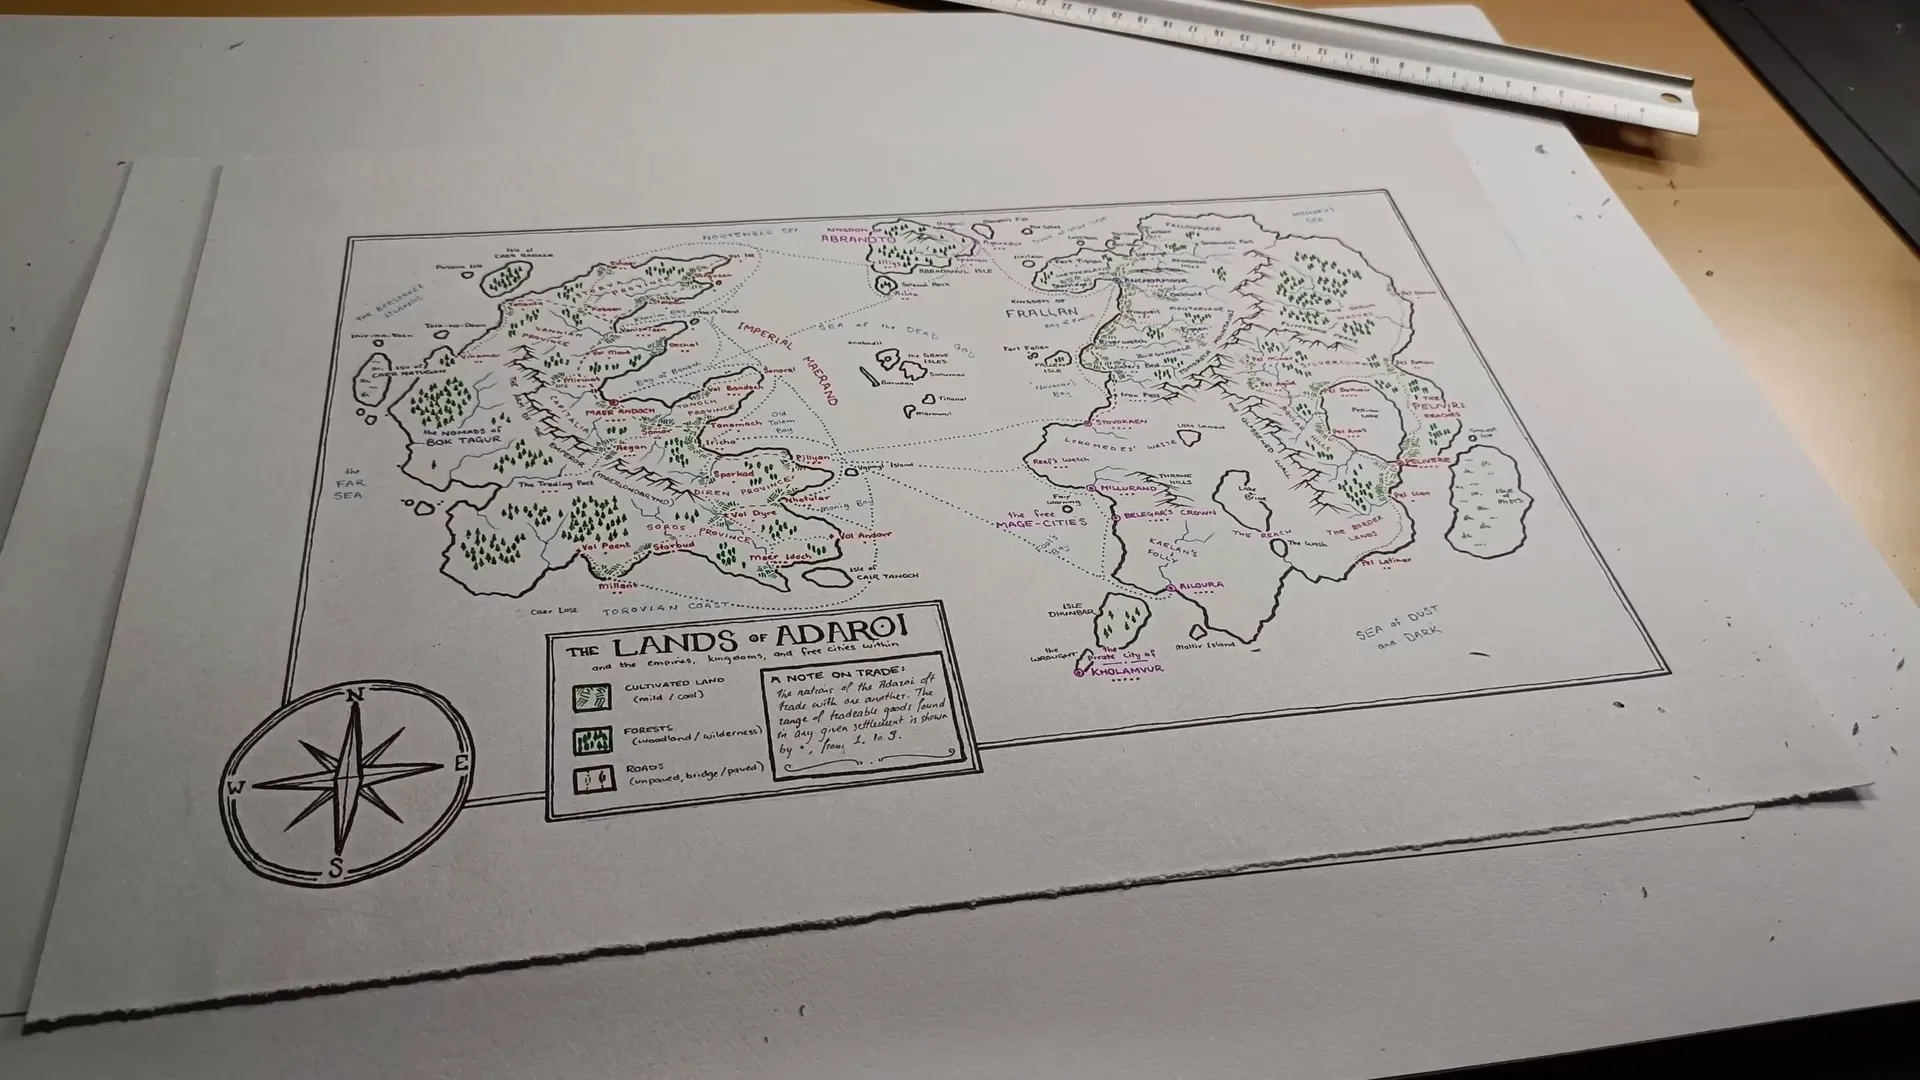
- Scale and coverage: Decide how much of your world this map covers. The example scale I use is roughly 1.5 inches = 100 miles (the map I show ends up roughly 1,000 miles across by 600 miles tall).
Having the scope nailed down helps determine what features are worth including. If the map covers 1,000 by 600 miles, you must compress information; that’s precisely what the DM map should do.
Step 2: Start with the DM map — prioritize labels and compressed information
Work on the DM map first. This is the map that will form the backbone of your world's economy, travel mechanics, encounter tables, and political geography. For this map the usual “make it pretty first” workflow flips: the priority is dense, readable information rather than immediate aesthetics.
Key philosophy: The DM map must compress a lot of information and present it in a way you can parse quickly during play. It does not need to be obvious or fully legible to players — it needs to be functional for the DM.

How I compress information:
- Labels first: Write names of kingdoms, regions, seas, bays, islands, and settlements early. Placement of labels will help the rest of the drawing make sense.
- Color-code political regions: Rather than drawing heavy borders, color areas in related hues (e.g., red/pink/purple for political entities). This reduces visual noise and preserves space for labels.
- Maintain visual hierarchy: Capitals and major cities use larger, clearer labels. Smaller towns are smaller but still present. Regions and kingdoms stay readable but unobtrusive.
By labeling early, you ensure natural features (coastlines, rivers, mountains) serve the map's narrative rather than dictating where towns must go. The DM map is about "what's in the world" more than "what the land looks like."
Step 3: Encode trade and economic information — a dot-based goods scale
A map can silently answer hundreds of questions if you design a compact key for trade and resources. One technique I use is a dot-ranking system for settlement goods availability.

How the dot system works:
- 0 dots: Farmsteads or tiny settlements where you can't reliably buy much; useful stopping points but not trade hubs.
- 1–2 dots: Small villages with basic goods and a few craft specialties.
- 3 dots: Mid-sized towns with a variety of trade goods and services.
- 4 dots: Large towns with wide-ranging markets, including some exotic items.
- 5 dots: The mega-hubs — the places you can buy almost anything (magical items, rare ingredients, etc.).
Using this system you and your players can quickly determine where to source supplies, specific ingredients, or particular magic items — and more importantly, you preserve internal consistency for the world. If potion reagents only show up in 4–5 dot towns, you won't suddenly have to invent why a vial of basilisk blood is found in a one-dot hamlet.
World-building wins: the dot scale gives locations economic weight, turning shopping into a strategic decision. It also creates natural reasons for travel: caravans route toward 3–5 dot towns, and those towns become places of interest.
Step 4: Add military and travel infrastructure — forts, roads, and sea lanes
After settlements, add the infrastructure that governs movement and conflict. These elements are invaluable during play because they shape encounter possibilities and travel costs.

What to include and why:
- Forts/border posts: Mark them with a simple cross symbol. In the absence of explicit borders, forts show where a kingdom’s influence ends and where patrols or garrisons are active.
- Road types: Differentiate between unpaved/unpatrolled tracks and paved/highway routes. Use a thinner, rougher line for dirt roads and a thicker, straighter line for highways.
- Toll markers: Use a darker brown or small symbols to point out toll houses and toll bridges. These are excellent hooks for random encounters (extortionist patrols, corrupt guards, shady toll bargains).
- Sea routes: Draw shipping lanes and major naval passages in blue. If possible, note which lanes are regular and which require chartering a private vessel.
Design considerations:
- Paved = economic priority: The quickest, cheapest overland routes tend to be paved. Link major economic hubs with these highways to show how trade flows.
- Unpaved = danger and opportunity: Dirt routes are perfect places for banditry, natural obstacles, and smaller, localized encounters.
- Sea routes = dual costs: Where a coastal town sits on a regular shipping lane, passage is simpler (and cheaper) than chartering a ship from a remote harbor. These distinctions affect campaign logistics and player choices.
Step 5: Build the natural ecosystem icons — farmland, marsh, woodland, and wilderness
Nature icons do more than decorate. They communicate climate, culture, available food, and likely encounter types. I use 2–3 variants for farmlands and forests to convey subtler ecological differences.

Farmland differentiation:
- Light green farmland: Implies a Mediterranean or milder climate — certain crops, different seasonal weather, and cultural cuisine.
- Dark green farmland: Implies cooler, more northern climes — different farming techniques, storage, and food culture.
Why this matters: a city surrounded by light green fields will have different exports, food types, and festival seasons compared to a city in darker green fields. The map can infer culture without exposition.

Forest differentiation — woodland vs wilderness:
- Woodland (oval trees): Long-settled, domesticated forests inside kingdom boundaries. Expect woodland fauna — wolves, occasional bears, but rarely monstrous threats. Safer for trade and travel.
- Wilderness (triangle/pine trees): Unsettled, untamed forests with little permanent human presence. These areas are likely to host truly dangerous encounters: griffins, dragons, roaming giants, and other high-level threats.
This distinction lets you set encounter expectations and avoids railroading: if your players are in a woodland, they won’t plausibly run into a marauding dragon unless specific story reasons apply. In the wilderness, such high-stakes encounters are plausible and expected.
Step 6: Finalise the DM map — add islands, rivers, mountains, and labels
At this stage your DM map should contain the essentials needed to run a living world: labeled regions, settlement trade-scale dots, forts, road/sea infrastructure, natural icons, and a clear scale. Add remaining geographic features — coastlines, rivers, mountain ranges — but keep the visual hierarchy focused on usable information.

Polish tips:
- Keep labels legible: Your eyes must find town names quickly. Use consistent sizing and spacing.
- Compress details into keys: If you record toll prices, exchange rates, or shipping passage fees, keep a small legend or separate DM notes rather than litter the map with tiny text.
- Save an annotated digital scan: Scan or photograph the finished map so you can add session notes, move encounter markers, or overlay secret annotations digitally.
Step 7: Start the player map — make it evocative and intentionally incomplete
Once the DM map is complete, it’s time to create the player-facing map. The goal here is opposite to the DM map: make the map an invitation to explore, not a checklist of everything you already know. The player map should feel like a tavern map — attractive, evocative, and leaving pockets of blank space for discovery.

Design decisions for the player map:
- Start with watercolor washes or wide inks: These immediately give the map a tactile, attractive look and avoid the clinical detail of the DM map.
- Limit the palette: Use 2–3 bold colors (for example: dark blue, red, and black). This ensures the map is readable and leaves players room to annotate with their own pens.
- Leave blank regions: Purposefully omit peripheral areas and many small settlements. This creates mystery and gives you more story options when players ask “what’s beyond the map?”
- Include iconic illustrations: Decorate major cities with small drawings (a harbor, spire, or ruin) to convey flavor rather than functional detail.
Step 8: Trim the coverage — keep edges unfinished for mystery and expansion
One of the most powerful tricks is deliberately making the player map smaller than the DM map. Cut off entire regions, powerful cities, or dangerous reaches. When players ask “what's past the border?” you’ll have small, meaningful answers ready — quest hooks, rumors, or future campaign arcs.

Why this works:
- Creates scope: Players sense the world is bigger than this paper, which is exciting.
- Protects spoilers: You avoid giving away high-level locations or plot-critical sites.
- Offers future content: The areas beyond the map are natural next steps for the campaign — the pirate city, the remote reaches, hidden continents.
Step 9: Choose which settlements to show — main hubs, not every hamlet
On the player map, include the main cities and a selection of mid-sized towns. Omit many one-dot settlements (the tiny farmsteads and isolated huts). These omissions become fodder for exploration: “That councillor lives in a place not listed on this map — he lives near a small pier east of Green Hollow.”

Practical guidelines:
- Place main settlements: Put capitals, big trade towns, and major ports on the map with distinct illustrated icons.
- Omit many small nodes: Leave room for rumors, side quests, and the joy of discovery.
- Keep travel sense: Show major roads and rivers to give players a sense of routes without exposing tolls, patrols, or specific hazards.
Step 10: Add evocative details — illustrations, a compass, and a grid
Add the finishing touches that make the player map feel like an object in the world. A decorative compass rose, an aged border, and an unobtrusive grid for rough travel distances are great. Use tasteful illustrations for cityscapes, a small monster silhouette in the wilderness (optional), and a title banner.

Make the map a tool for roleplay:
- Illustrations are cues: A drawing of a harbor suggests seafaring culture; a temple silhouette suggests religious significance.
- The grid helps navigation: Provide a simple way to estimate travel times without getting into the DM map's precise tolls and distances.
- Encourage player notes: Leave pockets of blank coast or inland areas where players can pin their own discoveries.
Step 11: Practical uses at the table — how to run with both maps
Two maps are most effective when used in tandem. Here’s how I use them during sessions and prep.
- DM map as the canonical ledger: All economy details, patrol routes, toll fees, and minor settlement names live here. It’s your truth-resource for anything the players might inquire about.
- Player map as the immersion prop: Hand it out, let players annotate it, and use it to spark roleplay and in-party planning.
- Keep secrets off the player map: If a ruin or a cult hideout is plot-critical, don’t show it. Make it a revelation earned through investigation.
- Use the DM map for quick adjudication: If a player wants to buy a rare reagent, open the DM map, find the nearest 4–5 dot town, and determine cost and availability from your notes.
- Scan both maps: Keep digital copies so you can annotate them in handwriting or with image layers during the session without altering the originals.

Step 12: Expand and iterate — the map is a living document
Your maps will evolve. As the campaign progresses you’ll add battle scars, newly discovered settlements, and bookmarks marking the party’s favorite taverns. Treat the DM map as the canonical ledger and the player map as a scrapbook players want to fill in. Here are ways to grow both maps meaningfully:
- Session marginalia: Add small notes to the margins after sessions — merchant names, unusual prices, or rumors found in inns.
- Update trade dots: A siege or a newly-opened mine changes local economies. Adjust dot ratings to reflect changes.
- Introduce new player maps: If the party moves into a new region, create a fresh player map showing that area with the same philosophy: pretty but incomplete.
- Use map edges for escalation: When players outlevel your initial map's threats, reveal or create new regions beyond the edges rather than immediately increasing difficulty inside the known areas.
Step 13: Examples and storytelling hooks derived from map features
The way you design the map creates natural story hooks and procedural content. Here are a few examples you can pull directly from the map elements:
- Pirate hub with 5 dots: The only 5-dot port becomes a natural magnet for smuggling, rare goods, and criminal factions. A rumor about a unique magical trinket here is a perfect mid-game quest.
- Toll bridge along a paved highway: Turn that toll house into a recurring NPC who either extorts coins, asks for favors, or becomes a mole for an invading force.
- Wilderness pin near a caravan route: Use the wilderness iconography to justify unusually dangerous encounters, like a migratory dragon or a roaming giant clan that periodically raids trade routes.
- City without farmland: If a major southern city lacks surrounding farms on the map, make their food supply come from shipping or magic — both great plot devices (e.g., a famine, grain monopoly, or enchanted food supply).
Step 14: Quick checklist — what to include on each map
Use this checklist as you build your two maps.
DM map checklist
- Settlements with trade-dot ratings (0–5)
- Capitals and major cities clearly labeled
- Forts/border posts
- Detailed road types (paved vs unpaved) and toll markers
- Major sea routes and ports
- Natural features with differentiated icons (farmland types, woodland vs wilderness)
- Scale and an internal legend for any numeric systems (toll costs, exchange rates)
- Space for annotations, like caravan schedules or market prices
Player map checklist
- Main cities and ports with characterful illustrations
- Major rivers, mountain ranges, and primary roads (no tolls or patrol notes)
- Limited set of mid-sized towns; omit many small settlements
- Blank areas intentionally left for exploration
- Decorative compass, grid for travel estimation, and title/banner
- Simple, limited color palette to facilitate player annotations
Conclusion — two maps, one shared world
Creating both a DM map and a player map takes more time than drawing a single "everything" map, but the payoff is huge. The DM map becomes your authoritative world-building tool: a compressed ledger of economics, influence, and potential plot hooks. The player map becomes a tactile narrative prop that invites players to explore and write their own story into the world.
"If you give them a map of a world that's already been explored, they're not explorers. If you give them a map that has far fewer details and they can start filling it out as they go, that means that they are actively making a difference in their understanding of the world."
Make the DM map dense and useful. Make the player map evocative and incomplete. Use icons deliberately: dots for trade, crosses for forts, different tree shapes for woodland versus wilderness, and distinct farmland colors to convey climate and culture. Keep the edges of the player map trimmed so the world can grow. Scan both maps and keep annotated versions for quick reference during sessions.
If you follow these steps, you'll end up with two complementary resources that let you run richer sessions and let your players play the role of curious travelers again. Happy mapping — and may your roads be paved where you want them and perilous where your players deserve it.
Made with VideoToBlog using S11E0 Dm Maps vs Player Maps.mp4